
Whether you're starting your first survival adventure or have been playing with us for a while, these commands will help you navigate the server, interact with other players, manage your builds and enjoy the features available throughout the SMP.
To use a command, press T to open Minecraft chat, type the command beginning with /, and press Enter.
Commands containing <player> or <name> require you to replace that text with the appropriate player or location name. Commands with [optional] arguments can be used without them.
Example: /tpa Alex means type the actual player name instead of <player>. Do not type the angle brackets or square brackets themselves.
🏠 Homes & Teleportation
Save your favourite locations, visit other players and travel around the server.
| Command | Description |
|---|---|
/spawn | Return to the main server spawn area whenever you want to meet other players, reach community facilities or find your way back. |
/sethome [name] | Save the block you are standing on as a personal home. Give it a memorable name so you can find it again. Example: /sethome base |
/home [name] | Teleport back to a previously saved home. If you use multiple homes, include the name of the destination. Example: /home base |
/delhome <name> | Delete a home you no longer need. This removes the saved location; it does not delete any buildings or blocks. Example: /delhome oldbase |
/renamehome <old> <new> | Change a saved home name without travelling to the location again. Example: /renamehome base workshop |
/back | Return to your previous teleport location or death location, if permitted in that world. Useful after a trip or an unexpected death. |
/tpa <player> | Ask to teleport to another player. You will only travel if they accept your request. Example: /tpa Alex |
/tpahere <player> | Ask another player to teleport to your current position. They choose whether to accept. Example: /tpahere Alex |
/tpaccept | Accept a teleport request you have received. Check who requested it before accepting. |
/tpdeny | Decline a teleport request without moving anywhere. |
/tpacancel | Cancel a teleport request you sent before the other player accepts. |
/tpr | Travel to a randomly selected location, where random teleportation is available. Useful for finding fresh land to explore or build on. |
/warp | List the server warp destinations available to your account. |
/warp <name> | Travel directly to a named public location such as a farm, community area or server landmark. Example: /warp BlazeFarm |
/warpinfo <name> | View details about a specific warp destination before travelling there. Example: /warpinfo S4Bridge |
How to save and return to your base
- Stand in a safe spot at your base and type
/sethome base. - Travel elsewhere or explore the world.
- When you want to return, type
/home base. - You can save other locations using different names, subject to your home limit.
How to teleport to a friend
- Type
/tpa Alex, replacing Alex with your friend’s Minecraft username. - Your friend types
/tpacceptto accept or/tpdenyto decline. - To invite a friend to come to you instead, use
/tpahere Alex.
Tip: Teleport requests require the other player’s approval. Use /tpacancel if you change your mind.
Available Warp Destinations
The server has permissions configured for a variety of warp destinations, including:
/warp Spawn— Main server spawn./warp BlazeFarm— Blaze farm./warp StringFarm— String farm./warp NetherRoof— Nether roof destination./warp PVP— PvP area./warp S4Bridge— Season 4 bridge./warp HalloweenComp— Halloween competition area./warp SPACE_CITADEL— Space Citadel./warp village— Village destination./warp end— End destination.
Additional warps may be available. Use /warp to view the destinations accessible to you.
💬 Communication & Social
Keep in touch with friends, send private messages and communicate with other members.
| Command | Description |
|---|---|
/msg <player> <message> | Send a private message that only the selected player receives. Good for organising a build or asking a friend a question. Example: /msg Alex Are you at spawn? |
/r <message> | Quickly reply to the player involved in your most recent private message conversation. Example: /r I will be there shortly! |
/mail read | Open your in-game mail, including messages other players sent while you were offline. |
/mail send <player> <message> | Leave an in-game mail message for another player to read later, even when they are offline. Example: /mail send Alex I left some supplies for you. |
/ignore <player> | Ignore or unignore messages from a player. Run the command for that player again to change the setting. Example: /ignore Alex |
/me <action> | Display an action-style message in chat instead of a normal chat message. Example: /me waves at everyone |
/list | See the players currently connected to the server. |
/afk | Mark yourself as away from the keyboard. Your AFK status may also change automatically based on server settings. |
/realname <nickname> | Find the underlying Minecraft username of somebody using a display nickname. Example: /realname Builder |
Private message example
To send Alex a private message, type /msg Alex Are you free to help build?. If Alex replies, you can respond with /r Yes, I am on my way! without entering their name again.
Tip: Use /mail send if you want to leave a message for somebody who is not currently online.
💰 Economy & Shopping
Earn and manage in-game currency, trade with other players and buy or sell items.
| Command | Description |
|---|---|
/shop | Open the server shop to browse available items, prices and buying or selling options, where enabled. |
/balance | Check your current in-game money balance before buying items or paying another player. |
/balancetop | View the server balance leaderboard and compare in-game balances. |
/pay <player> <amount> | Transfer the specified amount of in-game money to another player. Double-check the username and amount before sending. Example: /pay Alex 250 |
/sell hand | Attempt to sell the eligible item you are currently holding. The amount accepted depends on the shop system. |
/worth hand | Check the estimated selling value of the item you are currently holding before selling it. |
/sellall | Sell eligible items from your inventory in one action, where the shop supports it. Check your inventory first to avoid selling something you intended to keep. |
Buying, selling and paying players
- Type
/shopto browse the shop and see which items are available. - Check your funds using
/balancebefore making a purchase. - For selling, hold an item and try
/worth handto check its value, then/sell handif you want to sell it. - To pay another player directly, type
/pay Alex 250, replacing the username and amount.
Important: Check your inventory carefully before using /sellall, as it may sell multiple eligible items at once. Shop availability and accepted items depend on the world and shop configuration.
Important: Economy and shop permissions vary between worlds. The main economy features are explicitly granted in Season 4 and the main world, with restrictions configured for earlier seasons.
All currency is earned and used within Minecraft. NathanM11 SMP remains completely free to play, with no real-money purchases or paid gameplay advantages.
🤝 Player Trading
The server supports player-to-player trading through a dedicated trading system.
| Command | Description |
|---|---|
/spt | Open your own player trading interface to review or manage trade offers. |
/spt trade <player> | Open the named player’s trading interface to inspect their offers and any available exchanges. Example: /spt trade Alex |
/spt help | See the available trading commands and their correct syntax. |
How player trading works
- Type
/sptto view your own trading interface. - Use the interface to review your offers and the options available to you.
- Type
/spt trade Alexto open Alex’s trading interface and inspect their offers. - Check all items and any currency involved before accepting a trade.
Tip: The trading menu may offer additional actions not listed here. Use /spt help to see the commands available on the server.
You can use the trading interface to create offers and exchange items with other players. Trading permissions are configured for Seasons 2, 3 and 4, subject to world restrictions.
🛡️ Land Claims & Protection
Protect your builds and manage access to your claimed areas using our land protection system.
| Command | Description |
|---|---|
/claim help | Display the claim commands available to you and the expected command syntax. |
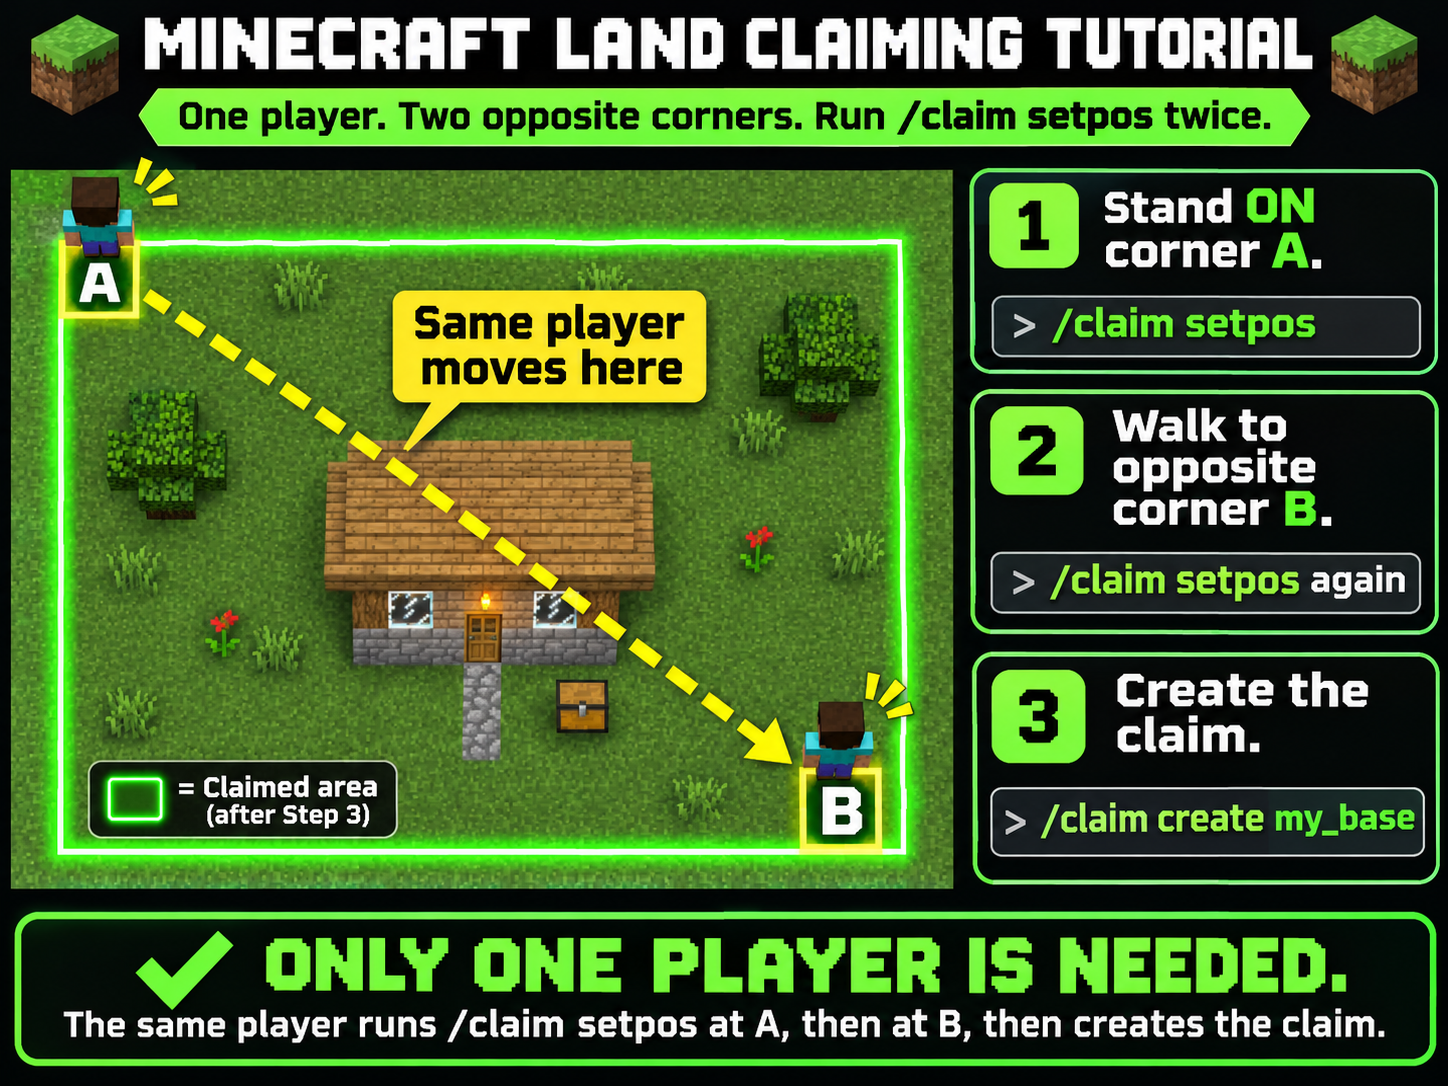
/claim setpos | Select the block you are standing on as one boundary corner. Stand in one corner and run this command; then walk to the diagonally opposite corner and run the SAME command again. |
/claim create <name> | Create a protected rectangular claim from your two selected corners. Choose a short, memorable name. Example: /claim create my_base |
/claim show <name> | Check a claim’s location and coordinates, and display its boundary using particles. Example: /claim show my_base |
/claim remove <name> | Permanently remove one of your claims. Its blocks remain, but its land protection is removed. Example: /claim remove my_base |
/claim teleport <name> | Teleport to one of your claims, where enabled for your permission group. A fee may apply. Example: /claim teleport my_base |
/claim movecorner <name> | Adjust the nearest corner of an existing claim to your current position, where permitted. Check the resulting boundary afterwards. Example: /claim movecorner my_base |
/claim friend invite <name> <player> | Allow a friend to build within your named claim while you remain the owner, if invitations are enabled. Example: /claim friend invite my_base Alex |
/claim friend uninvite <name> <player> | Remove a previously invited friend’s building access to your claim. Example: /claim friend uninvite my_base Alex |
How to claim your land — step by step
You only need one player. You select the first corner, walk across your land, and then select the opposite corner yourself. Both corners are selected using exactly the same command: /claim setpos.
- Choose the area you want to protect. Imagine a rectangle surrounding your house, garden, storage and any space you may need for future building. Leave a little room around the edges.
- Stand on the first corner (Corner A). Go to one outside corner of your planned area and type
/claim setpos. This records the block you are currently standing on. - Walk to the diagonally opposite corner (Corner B). Go all the way across the plot, not just along one side. Type
/claim setposagain while standing on the opposite corner. - Create the claim. Type
/claim create my_base. You can replacemy_basewith a name of your choice. - Check the boundaries. Type
/claim show my_baseto display your new claim’s outline and confirm it covers the intended area.
Example: If your house is in the centre of a 30-by-30-block plot, stand at the north-west corner for your first /claim setpos, then walk to the south-east corner and use /claim setpos a second time. You can then run /claim create my_base.
Managing your protected area
After creating a claim, you can check its boundaries using /claim show my_base. If friend access is enabled, /claim friend invite my_base Alex grants Alex building access, and /claim friend uninvite my_base Alex removes it. You remain the claim owner.
Before removing a claim: /claim remove my_base removes its protection, not the buildings inside it. Claim size limits, vertical protection, teleporting and inviting friends depend on the server’s permission settings. Claims generally cannot overlap another player’s protected area or an existing WorldGuard region.
⚔️ PvP & Combat
Control your participation in player-versus-player combat and check your current status.
| Command | Description |
|---|---|
/pvp | Toggle your PvP participation in worlds that allow players to change their PvP status. |
/pvp on | Enable PvP participation so that you can take part in permitted player combat. |
/pvp off | Disable PvP participation where allowed. Combat-tag restrictions or cooldowns may prevent immediate changes. |
/pvpstatus | Check whether your PvP participation is currently enabled or disabled. |
/tag | Check your remaining combat-tag timer, where the current PvP system supports it. |
Changing your PvP setting
Use /pvpstatus to check your setting. When permitted, /pvp on enables PvP and /pvp off disables it. If you have recently been in combat, you may need to wait for combat restrictions to expire before changing your status.
PvP permissions are configured for specific worlds, including Seasons 2, 3 and 4 and the main survival world. Combat restrictions and cooldowns may apply.
🎙️ Voice Chat
NathanM11 SMP supports proximity voice chat for players using the compatible Simple Voice Chat Minecraft mod.
| Command | Description |
|---|---|
/voicechat help | List the voice chat commands available to you, including features enabled on the server. |
/voicechat invite <player> | Invite another player to a voice chat group, where that group feature is supported. Example: /voicechat invite Alex |
/voicechat join <group> | Join a voice chat group, if it exists and you have permission to access it. Example: /voicechat join builders |
/voicechat leave | Leave the voice chat group you are currently in. |
Getting started with voice chat
- On Minecraft Java Edition, install a version of the Simple Voice Chat mod compatible with the server and your game version.
- Join the server and open the voice chat interface using V, unless you have changed the key binding.
- Select the correct microphone and speaker devices, then check that your microphone is not muted.
- Use
/voicechat helpto review any group commands enabled on the server.
Note: Text commands do not replace the client-side voice mod. Group functionality and voice support may vary by client and server configuration.
Java Edition players using the compatible mod can press V to access voice chat settings, subject to their client key bindings.
⚙️ General & Useful Commands
These commands provide useful server information and help with everyday gameplay.
| Command | Description |
|---|---|
/help | List the server commands your player account can access. |
/help <command> | Ask for detailed usage information about a specific command. Example: /help home |
/info | View general server information, where this command has been configured. |
/kit | Display the kits available to your player account. |
/kit guest | Claim the guest kit when you are eligible and any relevant cooldown has expired. |
/recipe <item> | Display a crafting recipe for an item rather than looking it up outside the game. Example: /recipe hopper |
/exp | Check your current experience level and progress. |
/helpop <message> | Send a message requesting help from available staff members, where supported. Example: /helpop Please help me with my claim. |
When something does not work
Start with /help or a specific command such as /help home. If the server says you lack permission, you may be in a world where that command is restricted, or the feature may have a cooldown. For problems affecting your build or claims, use /helpop Your message here if staff are available, or contact server support.
❓ Need Assistance?
If a command isn't working, remember that certain features may be limited to particular worlds or have cooldowns. Some functionality is also subject to server configuration and ongoing updates.
If you need assistance, have suggestions for improving the server, or notice something that isn't working as expected, please contact us at support@nathanm11mc.co.uk.
We're always working to improve NathanM11 SMP and make it a welcoming place for everyone to enjoy Minecraft.
Happy crafting, and we'll see you in-game!